|
|
|
|
|
|
|||||||||||||||||
Tips & information on installing the Lambretta TS1conversion |
|||||||||||||||||
|
|||||||||||||||||

|
For TS1 kits the best cylinder head to use for modifying to is the later type genuine Indian GP 200 side squish head. This is considerably thicker than previous heads and this minimises distortion when modified. There are some poorer quality pattern Italian & Spanish heads (never use a Servetta) around and these are not suitable for performance use. The cylinder head should be skimmed properly in order to raise the compression ratio to 9:1. Also ensure the squish clearance is between a minimum of 1mm and maximum of 1.5mm. This can be tested with some lead solder, carefully poked down the spark plug hole. Turn the engine until this is pinched, then remove and measure. To maximise performance a central plug head casting can be machined, however access to the spark plug for general maintenance is restricted. |
|

Go to the MB Developments site for additional information on cylinder heads
Back to Top
12V Electronic ignition kit
This gives much improved lights over standard 6V candle power, along with reliable ignition timing. Additionally it has a lighter flywheel weight, approximately half-way between the aluminium Ducati electronic flywheel and the original AF electric version. When fitting it may require modifications to the magneto flange area to ensure that it cannot touch the flange studs and wiring clips. On some magneto housings it may rub on the outer edge. The lighter flywheel weight leads to improved engine pick-up and acceleration and reduces the possibility of the crankshaft twisting due to excessive loads. It does, however, need a slightly faster tick over than normal to retain smoothness. Only available for non-battery systems but this should be no problem as the battery tray has to be removed as the carb mounts on the opposite side when you fit a TS1 225cc engine.
Click here for a wiring diagram and here for installation and setup instructions for this kit.
If you find your lights go dim when you brake then you may need to check & rewire your stator plate. Here's a simple diagram to improve the lighting.
Back to Top
Auto Retard ignition systems
This is apparently one of the best things you can do to your Lambretta. Works as a direct replacement for any Lambretta electronic ignition coil and as name suggests it auto retards ignition timing, giving maximum bottom end, mid range and top end pulling power. Provides a faster, cleaner more efficient burning engine and reduces pinking when using unleaded fuel. See MB Developments site for more details.
Back to Top
Reed valve cages and Block
Adding a reed valve in the intake path eliminates carb backflow by sealing off the crankcase as the piston makes it down stroke. This allows the intake timing to be unlimited allowing more fresh mixture to be trapped in the crankcase. This results in better low end power, often lost on tuned motors. Also extra transfer (boost) ports can be added, feeding off of the intake ports. This gets more fuel into the combustion chamber which provides greater mid-range power.
The rubber tipped 4-petal with grey fibre reed petals is the TS1 standard. Do not use non-rubber coated blocks as valve failure can occur. Remember to tighten all reed screws and add a dollop of silicon to keep them in place before fitting the reed cage.
An added advantage can be gained using Boyesen reeds which provide an increase in power when compared to metal or single petal fibre reeds.
Don't forget to install the 6mm spacer block under the TS1 reed blocks (particularly on 225's) This is used to move the reed valve away from the piston and reduce the obstruction of the rear boost transfer. This allows the boost port to breathe properly and further improve top end performance.
There are also 6 petal reed conversions available from MB Developments to fit 32-35mm carbs (see below)

Go to the MB Developments site for for additional manifold information
Back to Top
Gearbox
I run 16/46 sprockets with an SX200 gearbox which gives a gear ratio of 4.52:1. Although I'm quite happy with this when using the Taffspeed exhaust system gearing for a TS1 should be around 4.84:1. Most of my miles are done on the motorway cruising around 75-80mph and I'm not light, weighing in around 90kg.
Taffspeed recommend a top gear ratio between GP 200 and SX200 using an Indian or Italian GP gearbox with 19/46 sprockets. The larger front sprocket gives an easier time to the clutch and chain. MB Developments suggests slightly higher revving gear ratios, from 5.20:1 to 4.90:1, dependent upon exhaust used. As a general guide SX 200 gearbox with 15/46 and GP 200 with 19/46 gearing provide ratios of 4.84:1 to 4.80:1 respectively.
A longer chain (81 or 82 link) is required when fitting larger sprockets. Use either a good condition stretched or new race quality Regina chain with additional links. Standard LI/SX/GT chains are 80 link, GP are 82 link.
Remove and discard the top and bottom chain tensioners as on tuned motors the top chain guide has been known to break under the load. I personally don't use the bottom tensioner, instead fit an alloy top chain tensioner to improve reliability. These are also available in a hard plastic form and I have used both. The one advantage I have found with the plastic/nylon version is that it is a solid construction whereas the alloy ones have a nylon pad bolted on, which could wear through over a long time.
One other thing to fit is a stronger gear selector spring available from Taffspeed etc. Assuming cables are adjusted properly this should stop gears jumping out which can cause sudden very high revs and result in all sorts of engine damage (twisted cranks, broken flywheel tapers etc.).
-
Click here for a list of standard Lambretta gearboxes.
-
Go to the MB Developments site for additional gearing information.
-
Click here for Scooterhelp which has an excellent Lambretta gearing calculator.
Back to Top
Clutch
|
The clutch basket can be modified to take a 5 or 6-plate clutch rather than the standard 4-plate. Additionally stronger clutch springs are required and if these cannot cope then Vespa P200 springs can be fitted around these. I run 10 springs on a 4-plate clutch. Since having a road/race tune done on the TS1 barrel these have only lasted 1000 miles, whereas before with a standard TS1 they were totally knackered after 3K miles. I've since fitted a 5 plate clutch. A normal good quality 4-plate with the above spring set may suffice, but it is then more desirable to use larger front sprockets to reduce clutch load. A 5-plate is going to last much longer. Newfren cork plates give the best results in 5-plate clutch and Surflex 'B' in a 4-plate. Click here for details on replacing clutch plates |
|

Back to Top
Carburettors
There are several manufacturers that have carbs to fit tuned Lambrettas. In the UK Amal and Dellorto are popular whilst in the US Mikuni is more prevalent. Get a good selection of jets when you purchase these. The cost is low and helps when dialing in the carb either on a Dyno or using this link on carb jetting.
Dellorto - The Dellorto Flat Slide 30/32 VHSA carburettors use oval chokes combined with flat slides, and although taller than Amal carbs are much thinner. The VHSA has the smaller bodysize, fits underneath a full side panel and breathes properly without cutting a hole. The 34mm is slightly larger, so a hole is desirable for maximum performance.
On a 23bhp Taffspeed road tuned motor the Dynojet power curves are identical using 30-34mm carburettors. They've come to the conclusion that on TS1 motors of 25bhp (i.e. fast road tunes with engines that produce peak power below 8,000rpm) a carb size of 28 or 30mm is all that is required for maximum power. The improvement smaller carbs give to idle, pick-up & low-speed light throttle engine response is most noticeable. Note that 34mm carbs will need a larger rubbers and special manifolds.
Amal - Non-power jetted are preferred. These carbs will not breathe properly unless the panel on a full body work machine is cut to allow air into the bellmouth as the motor will not carburate cleanly. The closeness of an uncut panel will affect airflow into the engine unit.
The larger body carburettors normally cause interference with the edge of the toolbox area and modification here is normally necessary.
-
Click here for Lloydy's carb information page
-
Go to the MB Developments site for for additional information on carbs.
Back to Top
Fuel, fuel tanks & Oil
I use a good quality fully synthetic oil at a ratio of 33% or 33:1. No recommendations, everyone has their preferences, but ensure it's fully synthetic. You can use semi-synthetic oils but apparently you shouldn't mix these with synthetics as they can react & separate out of the petrol (sink to bottom of tank)
Use the best & highest octane fuel available from normal petrol pumps. This differs between the UK and US so in the UK I use Super Unleaded (never LRP or Lead Replacement Petrol) Standard unleaded is OK if your stuck. Can't remember what I used to use in the US, 97 Octane Super?
A fast flow fuel tap is essential and should let a pint of fuel through in 47 seconds.
The petrol tank capacity on a series III Lambretta is 1.78 Imperial gallons, with a reserve of 1 3/4 pints. This is fine for standard engines i.e. 200cc = 70.6 mpg, but this number is almost halved when you have a kitted engine. I get between 30-40 miles a tank from full to reserve/almost empty on a TS1 225, with 30mm Dellorto VHSA (depending how I drive) Dual tank conversions which utilise the tool box for additional fuel storage are popular, or large tank conversions are available either in aluminium, steel or fibreglass.
Click here for a review of the Burns Scooter Services Lambretta long range 14.5L petrol tank & how to install this.
Back to Top
Exhausts
Take your pick from the following, again there are plenty of other manufacturers to choose from. Try to get performance characteristics from the manufacturer before purchasing to make sure it's right for your setup i.e. if your engine doesn't produce peak rpm until 8500rpm don't get an exhaust that has a maximum rpm limit of 8000rpm.
I run my TS1 with the Taffspeed road system which is BSAU stamped. It's a good quality exhaust, has excellent construction, installation instructions and mounting design (no frame modifications required) and peaks out at around 7000-8000 rpm (maximum) I have found the side panel knocks on the exhaust stub, even with a Bitubo adjustable shock installed. A standard TS1 225cc will normally rev to 6500 - 7500 rpm using this exhaust. They also do a race replica systems which again is BSAU stamped which has better power and exceptional ground clearance. Taffspeed exhaust systems provide additional torque, but act as a rev limiter so your not thrashing the life out of your engine. To obtain higher speeds Taffspeed suggest upping the gearing (start by fitting a 4.00x10 rear wheel - this will modify your gear ratios up by around 8%)
MB Developments Lambretta Dev-Tour expansion systems - Made in the UK from thicker metal and designed for a long life span. Fully slip jointed, rubber mounted and adjustable. This fits all full bodywork Lambrettas with no frame alterations required. Fits standard cast cylinders and TS1 cylinders BSAU stamped, with reduced noise reduction. Designed for touring two up or fast touring one up. Provides good usable power from 5000rpm (50mph) to 8000rpm (80mph) with peak power at 7000rpm or 70mph. Higher gearing can raise this speed if required. Produces a maximum of 25 hp for maximum engine reliability and is ungroundable on any corner, even two up.
PM Tuning - Their PM28 pipe is exceptional. I fitted one to a mates TS1 and was extremely impressed with the quality, performance and tone. These exhaust systems offer the best usable spread of power and torque along with super ground clearance and style and durability to match. The down sides were that they weren't painted and this had to be done afterwards. You also need to cut up the rear running board to stop them hitting the bracket, apparently this has been modified with the 2000/2001 versions.
Back to Top
Bearings
High rpm destroys bearings, Indian big end bearings do not last much more than 3000 miles and standard Italian crank bearings fail if revved hard on high mileage motors (a feature of exhaust/motor characteristics). This is one reason to fit longer Japanese conrods as these give less angular movement so the bearing does not rotate as fast.
Big end bearings - These do not go round and round like a main or drive side bearing. They move back and forth as the crank rotates so they accelerate stop, rotate the other way, stop, rotate back the other way again. This acceleration and stop/start can cause the rollers to skid on the pin and bearing cage, heat builds up and the bearing overheats, flash burns the lubricant and fails. NU2205
Magneto/Flywheel and drive side bearings - Best quality is found with bearings of European or Japanese manufacture. These have a plastic cage, which allows a larger number of rollers and greater load capacity. All other engine bearings should be of best quality or replaced (if in doubt) to avoid premature failure.
-
For the magneto or flywheel side bearing use NU2205 for GP/DL or NU205 for LI/SX/TV/GT.
-
For the drive side bearing use 6305 C3, C4 or P64 for all models.
Japanese small end bearings - These are required to withstand high RPM use and help avoid the cage shattering when revved very hard (not unknown when standard or poor quality bearings are used) Note small end bearing sizes differ dependent upon the piston and rod used.
For a step by step guide to removing & replacing these bearings click here. If your rebuilding your Lambretta engine to fit a TS1 it's a good idea and cost effective to replace ALL bearings at the same time.
Other bearings
A listing of all bearings and oils seals can be found here:
Back to Top
Suspension
|
Often overlooked on a tuned scooter, suspension is extremely important for decent handling, braking, cornering etc. I've almost crashed before because of a shitty leaking rear shock bouncing around all over the place as I was cornering hard. |
|
|
Rear suspension - I fitted a Bitubo which wasn't cheap but offered an improvement over the standard leaking shock I had previously. These are fully adjustable for pre-load on the spring and have variable dampening. They are also nitrogen charged and fully re-buildable. I must add I've had a few problems with my rear Bitubo shock. It's had already been rebuilt once by AF Rayspeed at a cost of £30 and I've only done 150 miles on it and it's started leaking again! When fitting the Bitubo the nitrogen valve should be at the bottom facing towards the back of the scooter, with the 1-5 adjuster at the top. Taffspeed offer the same features on their shocks, which also have optional spring strengths. For example they offer as standard a dual rate spring that optimises suspension performance and is rated at 275/350 lbs. This allows softer initial movement when one-up, and heavy later movement to cope when two-up or heavily loads. The original very light or very heavy single rate springs are now optional. |
|
|
Front suspension - I replaced the front fork springs with a new set from a TV175 Series 2. These are progressively wound and 15% harder than standard - a big improvement. As I fitted disk brake links I also converted the earlier style spring guide rods to the later version that utilise a ball bearing rather than the integrated rod ( makes servicing easier) Whilst your at it replace all the rubber rebound blocks. If your front forks don't have dampers fitted or brackets for these you can fit an aftermarket pair or change the fork links over. To fit the aftermarket brackets there should be a spot weld indentation on the back of each of the fork legs. Line the top edge of the bracket up with the bottom of that indent. Also ensure you remove the zinc plating off of the brackets as this can contaminate the weld and weaken it. Aftermarket front dampers will make a difference. There are several Japanese varieties available, although I use standard Sebac shocks on the front with no problems. |
|

Back to Top
Brakes
|
I used to run a standard cable operated Lambretta Innocenti front disk brake. Ensure you fit decent pads, such as Newfren. The disk assemblies are now being re-manufactured and cost around £200. Fork disk links are also now re-produced, around £50 a set. For standard drum brakes always use decent quality brake shoes from a reputable supplier, slotted ones are available. A slight improvement in braking performance can be gained by converting your existing front brake cable setup to reverse pull where the cable comes in the back of the lever instead of the front. Instead of floating with the suspension when you brake, this setup makes the cable pull even more as the suspension "dives" under braking. Click here for instructions from the LCGB site. Hydraulic disk - Fitting a hydraulic front disk brake gives big braking benefits. However there is a big ugly master and slave cylinder to be hidden. MB Developments offer these conversions in the UK as well as Taffspeed who now offer a replacement back plate hydraulic conversion for ~£120. In the US try West Coast Lambretta Works ScootRS do a great complete hydraulic disk set-up for Lambrettas. Check this link for details and other information. |
|

Back to Top
Tyres
|
There are many different tyre manufacturers available; Michelin S1's and S3's, Bridgestone Hoops, IRC etc. These come in 3.50x10, 4.00x 10 or 100/90x10 sizes. The important thing is to fit a decent quality tyre (same on the front and back) and check them regularly for wear and correct pressures.
|
|

Back to Top
Porting
Using a 28-32mm carb and performance exhaust system with the standard TS1 cylinder kit you can get around 20bhp, compared to about 11hp for a stock GP200. When ported for additional power with a standard or Japanese piston you can expect between 23bhp-25bhp, 20% extra over a standard TS1 cylinder. This conversion places stress on other parts of the engine and requires that elsewhere in the motor other components are 100% or better. Taffspeed do both a fast road tune and a quick road tune for the TS1 top end. This opens up the exhaust port up from 40mm to 44 or 45mm. Additionally the exhaust port is rounded off (7-8% higher) The outcome can be between an extra 2-4 bhp!
Other tuning/porting stages
-
Stage 4 - For standard piston, big carb and performance exhaust - Intake and exhaust ports enlarged, matched to manifolds and polished. Transfer ports matched to piston, radiused and blended in. Substantial increase in performance without knackering your piston.
-
Stage 5 - Japanese conversions - As above which offers a good balance of reliability and power for road use.
-
Stage 6 - Again as above but the transfer ports are enlarged for additional mid range and top end power for road or race.
-
Stage 7 - All ports are enlarged throughout their length, including the transfer ports which are matched to the engine cases.
If you are going to have porting work done on a TS1 then it is better to do this to a worn cylinder and then replate. There is always the risk of plating being chipped when porting a new cylinder and there is an edge left that can give heavier wear than if the plating runs into chamfers put on the ports like the original TS1 cylinder has.
If your crankcase porting has gone too far (!) then you can TIG weld it back using rods: 4047a or 4043A. The latter is recommended as 4043A contains a small amount of magnesium and matches the parent metal better.
Go to the MB Developments site for additional information on TS1 tuning.
Back to Top
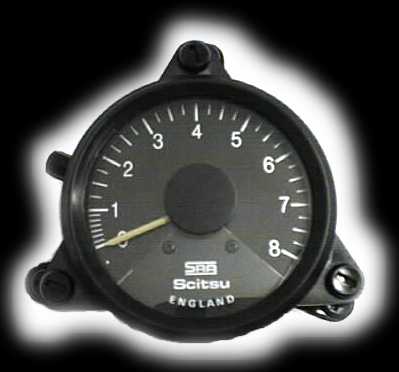
Rev Counters
The traditional analog versions are:
-
The rectangular Pitsch/Krober.
-
Scitsu, see picture on right (ensure it has a red colour on the back for 2 stroke, single cylinder application, click here)

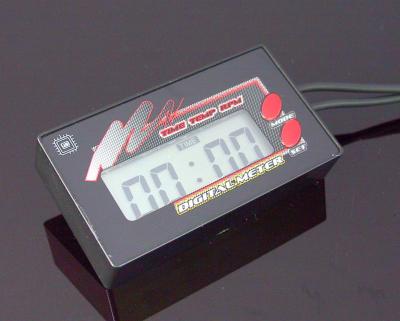
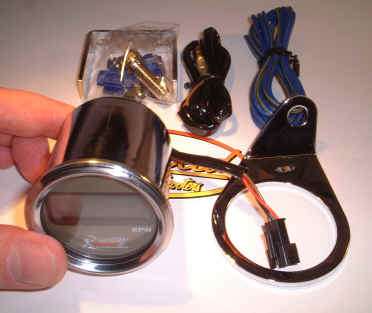
Digital rev counters or tachometers
-
PM Tuning sell digital rev counters / temperature gauges, see below £69.95 + VAT at time of writing (see below) Seen these on a few scooters recently.
-
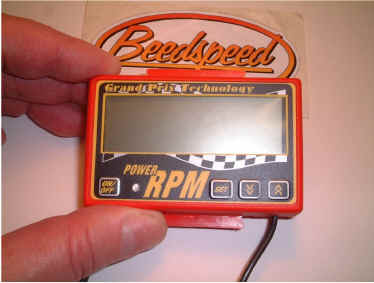
Beedspeed also sell the Koso and GPT digital rev counters.
What parts are needed?
These parts are for a standard TS1 225 conversion and are based upon dealers and parts I've used. All prices are approximate as of November 2002
ENGINE
Lambretta 200cc engine casing with engine mounts - £100 (Scooter Restorations)
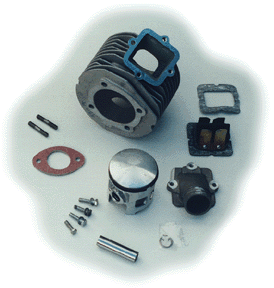
TS1 225 kit (Barrel, piston, reed valve, inlet manifold and gasket
set) - ~£265 (AF Rayspeed/Taffspeed)
TS1 225 skimmed Indian cylinder head - £21 (AF Rayspeed/Taffspeed)
AF race crank (standard 107mm rod) - £125 (AF Rayspeed/Taffspeed -
MB Developments also know their TS1 stuff.
Set of 4 Newfren clutch plates - £10
Stronger clutch springs - £10
Stronger gear selector spring - £0.75
Top chain tensioner - £18
16/17/18/19 tooth front sprocket - £20
New 81/82 link chain (if front sprocket changed) - £15
CARBURETTOR
Dellorto VHSA oval bore 30/32mm carb (fits full panels OK) - ~£130
Fast flow fuel tap - £15
EXHAUST
Taffspeed road/race exhaust - £265 (Taffspeed)
PM Tuning PM28 - £200
N.K.Racing/road exhaust - £149 (AF Rayspeed)
BEARINGS/SEALS
Good quality magneto/flywheel side bearing NU2205 (FAG) - £20
Good quality drive side bearing 6305 (FAG) C4 - £12.95
Better drive side bearing 6305 (FAG) P63 - £20
Clutch needle bearing - £2.50
Clutch bearing bush - £2.50
Gear end plate large bearing 6004 - £4.50
Rear hub/layshaft bearing - £17.50
End plate/layshaft needle roller bearing - £3
Gear cluster needle roller bearing - £3
Set of Rolf oil seals - £10
ELECTRICAL
12V electronic ignition - £100 (Scooter Restorations)
AF 12V electronic ignition - ~£125 (AF Rayspeed)
(includes flywheel, stator plate, CDI, regulator, junction box and cover plus terminals)
Electronic CDI & 12 volt rectifier mounting kit
for either of above - £25
DC wiring loom/harness - £12
Headlamp bulb 12V 45/40 £1.50
Headlamp bulb 12V semi-halogen £3
Speedo bulb 12V 2 watt £0.50
Tail lamp bulb 12V 21/5 - £0.50
Pilot bulb 12V 7 watt - £0.50
Horn 12V - £7
OTHER:
Wide rims - £25 (AF Rayspeed)
Decent shock absorber i.e. Taffspeed/Bitubo- £145
Hydraulic front brake inc. hose, fluid etc. - £150 (ScootRS)
Front shock conversion - £60
Stainless steel nuts/bolt kits - from £20 (MB Developments)
Lloydys GP225 TS1
Click here for my TS1 details.
Back to Top
Questions?
Any questions? Make them easy ones and email me
Back to Top
|
|
|
|